This was one of the Books & Snacks 2008 dishes. It makes a decent amount of food, so it would be good for a crowd.
Southwest Nacho Casserole
2 lbs lean ground beef (I did half beef, half turkey)
1 cup water
2 envelopes taco seasoning
1 can (4.5 oz) chopped green chilies
2 cans (16 oz each) refried beans
2 cups shredded Cheddar cheese (I used a four cheese blend)
1 cup chopped tomato
1/2 cup chopped green onions
1 can (2.5 oz) silced ripe olives, drained
1 bag gold tortilla chips (extra thick)
chopped cilantro if desired
sour cream if desired
1- Heat oven to 350 degrees. Spray 13x9 glass baking dish with cooking spray. Cook ground beef in a 12" nonstick skillet until thoroughly cooked. Drain and return to skillet.
2- Stir in water and taco seasoning into the skillet with the meat. Bring to a boil then cook for 2-4 minutes until thickened. Stir in chilies.
3- Spread refried beans into the bottom of the baking dish. Top with ground beef mixture. Cover tightly with foil.
4- Bake 30-40 minutes or until bubbly around the edges.
5- Remove from oven and uncover. Sprinkle with cheese, tomato, onion and olives. Arrange tortilla chips around the outside edges of baking dish. Return to oven and bake uncovered about 10 minutes or until cheese is melted. If desired, sprinkle with cilantro and top with sour cream. Serve with remaining tortilla chips for scooping.
Sunday, July 27, 2008
Mozzarella alla Caprese on a Stick
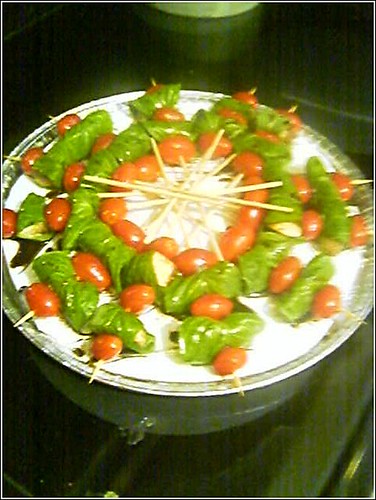
Sorry for the blurry image. The photo was taken back before I had a digital camera and only had the one on my phone. I made this for the first Family Dinner I went to back in Champaign when the theme was food on a stick. Since then, I've made it a number of other times and have they always get a great response. The fact that they're super easy makes them even better.
Mozzarella alla Caprese on a Stick
8 grape or cherry tomatoes
1 tablespoon virgin olive oil
4 (1/2 -ounce) balls fresh mozzarella (buffalo or regular)
4 large basil leaves
2 teaspoons balsamic vinegar (white or regular- using white limits discoloration, but I go with regular since it is what I already own)
Salt to taste
Fresh ground black pepper to taste
1- Make slits in each of the tomatoes (I usually do four around the sides from top to bottom). Marinate in the olive oil for 20 minutes.
2- Place the mozzarella balls in the balsamic vinegar and let set for 20 minutes. Remove the mozzarella and wrap in the basil leaves.
3- To assemble: Place one tomato on a 4-inch wood skewer, then the basil-wrapped mozzarella, then another tomato. Drizzle the remaining balsamic vinegar and olive oil over the entire kebab and season to taste with ground sea salt and cracked black pepper.
This makes four skewers. Recipe can be doubled, tripled, etc.
Wednesday, July 16, 2008
Maple-Glazed Walnuts
I've made these for Books & Snacks 2008. They have yet to be tried, but I've made similar ones in the past. That is somewhat reassuring to my nervous disposition.
Maple-Glazed Walnuts
1/4 cup light corn syrup
1 1/2 tsp maple flavor
2 Tbsp brown sugar
1/2 tsp salt
1/4 tsp hot pepper sauce
2 cups walnut halves and pieces
1- Heat oven to 325 degrees. Line a lipped cookie sheet with foil and spray foil with cooking spray.
2- In a medium bowl, combine all ingredients except walnuts and mix well. Add walnuts and toss to coat. Spread on the prepared cookie sheet, separating any large clumps.
3- Bake for 17 to 22 minutes, stirring every 5 minutes or until glaze thickens and adheres to nuts. Watch during the last 5 minutes to prevent burning.
4- Remove from oven and spread out nuts on waxed paper. Cool completely, then break apart.
Saturday, June 7, 2008
Prosciutto And Melon Skewers
Another food on a stick for Amy and Jim's shower. These look fancy, taste decadent and require no cooking. That makes them a win all around as far as I'm concerned. I do not have a melon baller (I know, I know), but I do have a small cookie scoop that worked just fine for the job. Because there are so few ingredients and no "seasonings," be sure that you go for good/high-quality items.
Prosciutto And Melon Skewers
12 thin slices of prosciutto
1 large ripe melon, such as cantaloupe
72 small mint leaves
1- Cut each slice of prosciutto in half lengthwise then fold in half lengthwise. Cut the melon in half, scoop out the seeds and peel away the skin. Cut the flesh into 72 equal pieces. If you are using a melon baller or cookie scoop, there is no need to remove the skin.
2- Thread a folded piece of prosciutto onto a skewer followed by a piece of melon and then a mint leaf. Fold the prosciutto around the melon piece and thread it onto the skewer a second time. Again follow with a piece of melon and a mint leaf. Do this one more time and then fold the end of the prosciutto over the top of the third melon/mint stack. When looking at the skewer, the prosciutto should be interwoven with three pieces of melon. Chill until required, but serve at room temperature.
Tabbouleh Party Pita Pockets
The ones without cheese were my vegan option for Jim and Amy's shower (in addition to the veggies and fruit of course). My version isn't exactly traditional tabbouleh as I didn't use bulgur, so I just called them Party Pita Pockets. They were still tasty or at least people told me they were.
Tabbouleh Party Pita Pockets
2/3 cup bulgur wheat (I actually used couscous as I had it on hand and needed to use it up.)
Juice of 1 large lemon
1 small garlic clove, chopped
2 Tbsp chopped fresh mint
2 Tbsp chopped fresh parsley
1/2 tsp ground cumin
2 tomatoes, peeled, seeded and diced (Yes, I used canned to make my life easier.)
4 scallions, minced
4 oz. feta cheese, crumbled
24 mini pitas (I got a package of whole wheat and one of white to further indicate the vegan vs. the not.)
1- Soak the bulgur wheat in a large bowl of cold water for 30 minutes; drain thoroughly (in my case, it was make the couscous and set aside).
2- Whisk together the lemon juice, garlic, mint, parsley and cumin in a small bowl. Stir into the bulgur wheat. Leave to marinate for at least 30 minutes and up to 8 hours.
3- Once marinated, add the tomatoes and scallions and mix well. If you intend to make the entire batch not vegan, you can also mix in the feta cheese at this point.
4- Lightly toast the mini pita breads and split each one across the top. Stuff with tabbouleh and serve. At this point, if you have not already mixed in the feta, you can sprinkle some of the crumbles on top of however many pitas you choose.
Sun-Dried Tomato And Olive Chicken Skewers
I made these for Jim and Amy's shower because everyone likes food on a stick.
Sun-Dried Tomato And Olive Chicken Skewers
7 oz. sun-dried tomatoes preserved in oil
1/2 cup pitted ripe olives
18 oz. boneless, skinless chicken breasts (I got the ones cut into tenders to save time.)
1 cup fresh white bread crumbs (I used seasoned packaged ones for simplicity's sake.)
2 Tbsp. chopped fresh parsley
1- Place the sun-dried tomatoes with the oil and the olives in a food processor and process into a rough puree. Season with salt and pepper to taste.
2- Cut the chicken into 48 1" cubes and place in a shallow non-metallic dish (or a large ziploc bag, which is what I used). Cover with tomato-olive mixture and marinate in the refrigerator for at least 30 minutes or up to 24 hours.
3- Preheat the oven to 400. Mix together the bread crumbs and parsley in a small bowl. Add salt and pepper to taste.
4- Thread 2 pieces of chicken onto each of 24 wooden skewers then sprinkle with the breadcrumb mixture (I lightly pressed each side of the skewered chicken into the breadcrumbs to minimize the mess.)
5- Arrange the chicken on a lightly oiled baking sheet and bake until the chicken is cooked through and tender (start checking it at about 10 minutes- you may want to turn the skewers over halfway through cooking to ensure a better crust on both sides.
6- Allow the chicken to rest before serving warm. These can also be served at room temperature.
Thursday, May 22, 2008
Broccoli And Cheddar Mini Quiche
Yes, my pretties, I know it's been a while since I've posted. It isn't because I haven't been cooking. Nor is it that I don't want to share the magic. I've just been swamped with other work and updating here has fallen by the wayside. But I'm hoping to remedy that with a flurry of posts over the next few days of tasty magical goodness I've been making since the last time I was around. Let's begin...
I've often made mini quiche over the years as finger food for various events. Usually I've done bacon, swiss, green onion and pimento or spinach, swiss and bacon. This time I needed a vegetarian option since I was making them for Jim and Amy's work-folk wedding shower, so I went with broccoli and cheddar. The nice thing about mini quiche is that once you have the basics down, you can change out the filling to suit your needs. Also, you can make these ahead of time and freeze them if need be.
Broccoli and Cheddar Mini Quiche
Pie crust for 2-crust pie (You can buy pre-packaged or make your own.)
1 cup cooked chopped broccoli (I got frozen florets to help speed things along since I was
making a ton of other food.)
1 cup shredded sharp Cheddar cheese
3 large eggs
1 tsp salt
1/8 tsp freshly ground black pepper
1 tsp Dijon mustard
1 cup heavy cream (You can also use half-and-half. I had heavy cream on hand so I went with it.)
1- Preheat oven to 400 degrees and grease and flour mini muffin tins.
2- Roll out pie crust to about 1/8" thickness (or if using pre-packaged, go with it as is when all unfolded). Cut out as many 2 1/2" rounds as you can from the dough. I have a scalloped edge cookie cutter that works perfectly and gives the edges a nicely finished look. Carefully fit each round into the muffin tin.
3- Sprinkle about 1/2 to 1 tsp of the chopped broccoli into each muffin cup and top with a small amount of shredded cheese.
4- Whisk together the eggs, salt, pepper, mustard and heavy cream. I do this in a liquid measuring cup with a spout to make the next step easier. Pour the mixture into each
muffin cup until just short of the top of the crust (about 3/4 full) and sprinkle each with a bit more broccoli.
5- Bake for 20-25 minutes or until set. When you go to remove these from the tins, use the edge of a knife to lift each mini quiche out as opposed to flipping the tin over.
Subscribe to:
Posts (Atom)
