Tuesday, April 9, 2013

Apple Cider Caramels


These are another item I made for the Philly Swappers food swap last night.  I brought some into work today and they were a major hit.  I've already been asked to bring in more, which I should be able to manage as I still have some apple cider and heavy cream.

I was inspired to do something with apple cider because I had some left in my fridge after the last Books & Snacks event.  I stumbled across one recipe for apple cider caramels and gave it a shot.  Unfortunately, they just did not turn out the way I wanted.  The texture was a bit off and the allspice was extremely overpowering to the point of hiding the apple cider flavor almost entirely.  Instead of apple cider caramels, they tasted like allspice caramels.  I don't know if I did something wrong or what exactly happened, but that batch wasn't going anywhere but the trash.

But I was stuck on the idea of wanting to make apple cider caramels.  I thought about trying the first recipe again, but then I saw someone mention a recipe for them over at Smitten Kitchen.  I took a look and figured I'd give this one a shot.  As is almost always my way, I tinkered just a little.  I liked the idea of a blend of spices from the first recipe so I adjusted as I went.  Feel free to change the ratios to taste.  I think I probably did a bit more cinnamon and a bit less allspice and nutmeg than I have listed here, but for the sake of the recipe, I've done more exact measurements.

The recipe calls for the caramel to come up to 252 degrees, which worked okay for me, but the caramels ended up just a touch firmer than I expected.  I don't know if that was the weather or some other factor, but the next time I try these, I might go to 251 or 250 and see how they turn out.

I'm not always the greatest at getting my mise en place all set before starting a recipe.  If you're like me, you'll want to break that habit for this.  Fortunately, you have the time while the apple cider is simmering down, but seriously, get everything out, measured, and ready before it is even close to done.  If you have other things you plan to make while the caramel is cooling, cut your waxed paper squares ahead of time.  You don't want the caramels to sit unwrapped once they've been cut.

Apple Cider Caramels

4 cups apple cider
1/4 tsp ground cinnamon
1/8 tsp ground allspice
1/8 tsp ground nutmeg
1 1/2 tsp fine sea salt
8 Tbsp unsalted butter, cut into chunks
1 cup granulated sugar
1/2 cup packed light brown sugar
1/3 cup heavy cream

Waxed paper cut into 4" squares (about 49, depending on how many caramels you eat before you get them wrapped)

1- Boil the apple cider in a large saucepan (original recipe calls for 3 or 4 quart, I used 2 1/2) over high heat until it is reduced to a dark, thick syrup, between 1/3 and 1/2 cup in volume. This took about 45 minutes on my (sigh) electric stove. Stir occasionally.
2- Line the bottom and sides of an 8" straight-sided square metal baking pan with a long sheet of parchment paper.  Make sure there is enough area sticking up over the sides that you can grab it.  You'll be using this paper to lift the caramels out of the pan later.  Stir the cinnamon, allspice, nutmeg, and salt together in a small dish.  Set these both aside.
3- When the apple cider is reduced, remove it from the heat and stir in the butter, sugars, and heavy cream. Return the pot to medium-high heat and let it boil until a candy thermometer reads 252 degrees (this took about 7 minutes on my stove).  You can use very cold water to test the caramel, but I think if you're going to try to do this, you're better off getting a thermometer to start.
4- Immediately remove caramel from heat, add the spice-salt mixture, and give the caramel several stirs to distribute it evenly. Pour into the prepared pan. Let it sit until cool and firm.  It took mine about three hours to cool.  You can use the fridge to make it go faster, but that didn't turn out so well for me with the first batch.
5- When the caramel is firm, use the parchment paper to lift out the caramel and transfer it to a cutting board. Use a well-oiled knife, oiling it after each cut, to cut the caramel into 1-by-1-inch squares. Wrap each one in a 4-inch square of waxed paper, twisting the sides to close.

These will keep in an airtight container at room temperature for up to two weeks.  Or take them to work and they'll disappear in a couple of hours.

 Caramels waiting to be wrapped

Sour Cream Cherry and Almond Scones


Yes, my dears, I am still here and making magical goodness in my kitchen.  I know it's been a while, and I'm trying to be better about posting.  I had a request for this recipe, so here we go.

I made these for the Philly Swappers food swap at Reading Terminal Market last night.  (Side note: It was a great time and I'll be posting about it in a while.)  The decision to make these came fairly last minute and was inspired by the fact that I had sour cream in my fridge that I needed to use and dried cherries in my pantry.  I think if I were to make them again, I would do something to make the almonds adhere to the top more- maybe pressing them down a bit before baking or doing a milk or egg wash before sprinkling them on top.  The dried cherries I had were a bit big and though I cut them in half before adding them to the dough, I think it would have been better for them to be chopped just a little bit more.

This started out as a recipe from Land O Lakes, and I didn't tinker with it too much.  I'm not familiar enough with making scones to feel safe making major changes.

Sour Cream Cherry and Almond Scones

For the topping

1/4 cup sliced almonds
1/2 Tbsp sugar

For the scones

2 1/2 cups all-purpose flour
1/2 cup sugar
2 tsp baking powder
1/2 tsp salt
1/2 cup butter, softened
3/4 cup sour cream
1 egg
1/4 tsp almond extract
1/4 tsp vanilla extract
2/3 cup dried cherries

1- Heat oven to 375°F. Combine all topping ingredients in small bowl and set aside.
2- Combine flour, sugar, baking powder, and salt in large bowl.  Cut in butter with pastry blender or fork until crumbly.
3- Combine sour cream, egg, almond extract, and vanilla extract in small bowl until smooth. Stir into flour mixture just until moistened. Add cherries.
4- Turn dough onto lightly floured surface; knead 8-10 times until smooth and cherries are well-distributed.
5- Divide dough in half. Pat each half into a 7-inch circle. Place 2 inches apart onto large ungreased baking sheet. Score each circle into 8 wedges; do not separate. Sprinkle topping evenly over dough.
6- Bake 25-30 minutes or until scones are lightly browned. Cool 15 minutes; separate scones. Store leftovers in airtight container at room temperature.


Thursday, April 26, 2012

Chicken Salad with Sun-Dried Tomato


The original recipe for this dish was designed to be a bruschetta, but because the baguette I bought was a bit too small to hold the mixture enough to be easily plated, mine ended up more as a salad with toasts served on the side.  Honestly, I think it turned out better in the end this way.  Also, the original calls for you to marinate and grill/cook boneless skinless chicken breasts as your first few steps.  As I was making other food for Books & Snacks, I was looking for a way to save some time, so I used a store-bought rotisserie chicken (one of the plain roasted ones, not a seasoned one like lemon-pepper).  Ultimately, not only did this save time, but I think it added flavor as I was able to have some dark meat in the mix and when cooked with skin and bone, the meat tastes better anyway.

Chicken Salad with Sun-Dried Tomato

1 rotisserie chicken
1/3 c. Italian salad dressing (You can use whatever brand you like for this, but I went with a classic Italian that was on sale at the store.  I'm not sure I'd do a zesty Italian for the first go-around, but it might be worth a try next time.)
4 c. fresh spinach, torn (I tried to tear these into fairly small pieces, like around the size of a nickel.)
1/3 c. crumbled feta (I may have tossed a little bit extra in to finish out the container I had, so maybe add 1/2 Tablespoon if you like feta.)
8-10 sun-dried tomatoes (not packed in oil), chopped (The range is because of the varying size of each tomato and how much you like sun-drieds.)
3/4 oz. pine nuts, finely chopped (I used my small food processor.  It doesn't need to be an exactly even chop; varied piece size is okay.)
1/2 tsp. dried basil (You could use fresh for this, but I used up the fresh I had making something else.  Double the amount if you use fresh and chop it finely.)
1 baguette or similar bread, cut into 1/2" thick slices (You could also get premade toasts from the bakery at the store.  In which case, skip step 3.)
1/4 c. olive oil

1- Break down the rotisserie chicken and cut up the meat into pieces. (I went with a fairly small dice and used both breasts and both legs.  You could also add the thigh and wing meat as well or save it for later.)
2- In a large bowl, mix the chicken, spinach, feta, sun-dried tomatoes, pine nuts, and basil.  Add the salad dressing and turn to coat.  (If the mixture seems too dry, you can add more salad dressing a Tablespoon at a time.  The mixture should have a gloss but should not be swimming in liquid.  Remember that the spinach will wilt some when combined with the salad dressing, so it may be best to wait a few minutes before adding more.)  Set the mixture aside.  If you plan to serve it later in the day, it should go into the refrigerator.
3- Preheat oven to 450.  Brush bread slices with thin coating of olive oil.  (Depending on the size and amount of bread you have, you could use more or less olive oil.)  Toast the bread for about 5 minutes, watching so it doesn't burn.  Remove from the oven and allow to cool before plating.
4- Serve the chicken salad in a bowl surrounded by the toasts or however else you fancy doing it.


Tuesday, June 8, 2010

Potato Chip Cookies


I love potato chips. I also love cookies. So it would make sense that I really enjoy these potato chip cookies. I know they sound weird and they kind of are. The texture is interesting and a bit different than most other cookies. The potato chips give them a bit of crunch almost as if they are aerated (similar to Aero, a British chocolate bar). I imagine the type of chips you use would change the texture even more. I went with plain Lays as opposed to Ruffles or thicker chips. First of all, thicker ones are harder to crush and I think they would be too noticeable in the finished product. These cookies don't taste like potato chips, but they might be just as addictive. They also get even better after a few days. So, if you have the chance, make them ahead of time.

Potato Chip Cookies

1 lb. butter
1 c. granulated sugar
2 tsp. vanilla
3 c. flour
1 1/2 c. crushed potato chips (Crush them with your hands for more consistently sized pieces)
powdered sugar, for dusting

1- Preheat oven to 350. Grease cookie sheet(s).
2- Beat butter until light and fluffy. Add sugar and beat well. Mix in vanilla, then add flour gradually. Add crushed potato chips to the mixture.
3- Drop from teaspoon onto greased sheet. Bake about 10 minutes or until brown around the edges. Sprinkle with powdered sugar. Cool completely.

Peppermint Meltways


These are quite similar to my previously posted Candy Cane Shortbread. They have a much stronger peppermint flavor and the texture is a bit different since there are no candy cane pieces in the dough. I think I prefer the Candy Cane Shortbread, but these are a decent option as well for a wintertime treat. And yes, I am aware that I'm posting about a wintry cookie in early June, but I'm trying to get caught up on recipes that should have been posted months ago.

Peppermint Meltaways

For the cookies:
1 c. butter, softened
1/2 c. powdered sugar
1/2 tsp. peppermint extract
1 1/4 c. all-purpose flour
1/2 c. corn starch

For the glaze:
1 1/2 c. powdered sugar
2 Tbsp. butter, softened
1/4 tsp. peppermint extract
1-2 Tbsp. milk
1-3 drops red food coloring, if desired
candy canes or hard peppermint candy, crushed

1- Preheat oven to 350.
2- For the cookies, combine butter, powdered sugar and 1/2 tsp. peppermint extract in a large bowl. Beat at medium speed, scraping the bowl often, until creamy. Reduce speed to low; add flour and cornstarch. Beat until well mixed. Cover and refrigerate until firm (30-60 minutes).
3- Shape rounded teaspoonfuls of dough into 1" balls. Place 2" apart onto ungreased cookie sheets. Bake for 12-15 minutes or until edges are lightly browned. Let stand 1 minute then remove from cookie sheets. Cool completely.
4- For the glaze, combine powdered sugar, butter, peppermint extract and enough milk for desired glazing consistency in small bowl. Stir in food coloring, if desired.
5- Drizzle glaze over cooled cookies. Immediately sprinkle with crushed candy.

Chocolate Covered Cherry Cookies


These cookies seemed like a good idea and they came out tasting decently. I will say that they were more labor-intensive than I expected based on the recipe. The dough doesn't quite hold the cherries as easily as it should and the frosting is a little thick. The recipe indicates that the frosting will spread over the cookies as they bake, which they do... sorta. Because the dough doesn't hold the cherries quite right, you are depending on the frosting to help hold the cookie together. This means that you have to put the frosting on prior to baking in a way that it covers the cherry completely. If I were to make these again, I think I would either add some kirsch or other liquid to soften the dough a little bit.

Chocolate Covered Cherry Cookies

For the dough:
1/2 c. butter
1 c. granulated sugar
1 egg
1 1/2 tsp. vanilla
1 1/2 c. all-purpose flour
1/2 c. baking cocoa
1/4 tsp. salt
1/4 tsp. baking powder
1/4 tsp. baking soda
48 maraschino cherries, patted dry (I don't think I ended up using all 48, but they didn't go to waste as my dad decided to have an ice cream sundae.)

For the frosting:
1 c. (6 oz.) semisweet chocolate chips
1/2 c. sweetened condensed milk
1-3 tsp. maraschino cherry juice

1- Preheat oven to 350.
2- In a mixing bowl, cream together butter and sugar until fluffy. Beat in egg and vanilla. Combine dry ingredients and gradually add to mixture. The batter will be firm.
3- Shape into 48(ish) balls about 1" round and place on ungreased cookie sheets. Push one cherry halfway into each ball.
4- In a small saucepan over low heat, melt the chocolate chips in the condensed milk, stirring constantly. Remove from heat and add cherry juice. Stir until smooth.
5- Spoon 1 tsp. of the frosting over cherries on each cookie. The frosting will spread over the cookie during baking.
6- Bake for 10-12 minutes. Cool on wire racks.

Fresh Apple Cake


I made this cake when I had apples that I needed to use. It came out decently, but it is rather difficult to get a clean slice. This isn't much of an issue when you're having it with breakfast, but if you are slicing it up to put on trays like I was, then it's a problem. I imagine making this as muffins, mini loaves or even in a large loaf pan would be lovely. Doing so would also be a good option for those of you who are somewhat wary when it comes to tube pans. This recipe came from an issue of Good Housekeeping. I must've torn it out of a magazine at the doctor's office or some such location since I don't get Good Housekeeping but I have no idea where exactly.

Fresh Apple Cake

1 c. chopped walnuts
3 c. all-purpose flour
1 tsp. baking soda
1 tsp. salt
2 tsp. vanilla extract
1 tsp. ground cinnamon
3 1/2 c. chopped Granny Smith apples
2 c. granulated sugar
1 c. vegetable oil
3 eggs
confectioners sugar for dusting (if desired)

1- Preheat oven to 325. Grease and flour 10" tube pan.
2- Place walnuts in a jelly roll pan and toast in the oven 7 minutes or until golden and fragrant. Cool completely in pan on wire rack. In a large bowl, whisk flour, baking soda and salt. In another large bowl, combine walnuts, vanilla, cinnamon and 3 cups of apples. Reserve remaining 1/2 cup of apples.
3- In a large bowl, with mixer on medium-high speed, beat granulated sugar, oil and eggs until well blended. With mixer on low speed, gradually add flour mixture. Beat 1 minute longer or until well combined. With spatula, fold in apple mixture (the batter will be thick). Spoon batter into prepared pan. Scatter remaining apple over top of batter and gently press into top of batter.
4- Bake 1 1/2 hours or until toothpick inserted comes out clean. Cool in pan on wire rack until completely cooled. Remove from pan and dust with confectioners sugar if desired.

Tuesday, December 22, 2009

Blueberry Banana Snack Cakes

The line between snack cake and muffin is one that is so fine that I choose not to walk it. The main difference here is that often with muffins you use the well method and add the wet ingredients to the dry whereas with this snack cake you do the opposite. Either way, these make a tasty treat. I think you could make these in a mini-loaf pan and have them come out nicely as well. They might even make a good gift.

Blueberry Banana Snack Cakes

1 1/4 cups sugar
2/3 cup butter, melted
1/4 cup buttermilk
2 eggs
1 tsp. vanilla
2 cups ripe bananas, mashed (about 3 medium bananas)
2 cups all-purpose flour
3/4 tsp. baking soda
1/8 tsp. salt
1 cup fresh or frozen blueberries
powdered sugar

1- Preheat oven to 350. Line muffin pan with paper cup liners.
2- In large mixer bowl, combine sugar, butter, buttermilk, eggs and vanilla. Beat at medium speed until creamy. Add bananas and beat until well mixed. Add flour, baking soda and salt. Beat at low speed until moistened (do not overmix at this point or snack cakes will get tough). By hand, stir/fold in the blueberries.
3- Spoon batter into paper-lined cups to about 2/3 to 3/4 full. Bake for 25-30 minutes or until a toothpick inserted in the center comes out clean. Remove from pan and let cool. Just before serving, sprinkle cakes with powdered sugar (this is optional if you want to keep them less messy).

Chocolate Chip Shortbread

If you've looked over old entries, then you may have become aware of my affection for shortbread and my various attempts at making it. This recipe came out rather nicely. The major downside is in appearance. If you bake these long enough to get a light brown color then they get a bit dry. Perhaps if the dough was rolled out and cut into shapes instead of done as drop cookies then you could fix this problem. Fortunately, the taste is undiminished by the outside color. You could also make these as plain shortbread by leaving out the chocolate chips.

Chocolate Chip Shortbread

2 cups flour
1/4 tsp. salt
1 cup butter, room temperature
1/2 cup powdered sugar
1 tsp. vanilla
1/2 cup chocolate chips (I used mini chips.)
granulated sugar for topping

1- Preheat oven to 350.
2- Whisk together flour and salt. In another bowl, cream butter and sugar. Add vanilla. Stir in flour mixture until dough forms. Stir in chocolate chips. Form into a ball, wrap in plastic wrap and chill for 1 hour.
3- Form dough into 1" balls and place on ungreased baking sheet. Dip the bottom of a glass in granulated sugar and lightly press each ball into a disc shape. Bake for 8-10 minutes. Cool on baking sheet for a few minutes before transferring to a wire rack to cool completely.

Friday, December 18, 2009

Mint Chocolate Cookies

There really aren't many better combinations than mint and chocolate. There's little you can do when blending these flavors that won't come out at least edible if not delicious. These cookies fell into the delicious category. I thought they reminded me of Andes mints. My mom said she thought they tasted like Thin Mints. Either way, delicious. These are basically the cookie recipe on the back of the Nestle Dark Chocolate and Mint Morsels bag, but hey, they've got a well-paid, well-trained staff coming up with recipes. Who am I not to steal them?

Mint Chocolate Cookies

2 cups all-purpose flour
2/3 cup baking cocoa (I'd avoid the super dark versions of baking cocoa out there right now for this recipe since the chips themselves are dark chocolate.)
1 tsp. baking soda
1/2 tsp. salt
1 cup butter, softened
2/3 cup sugar
2/3 cup brown sugar
1 1/2 tsp vanilla
2 eggs
1 2/3 cups (10 oz. pkg) Dark Chocolate and Mint Morsels

1- Preheat oven to 325.
2- Combine flour, cocoa, baking soda and salt in a small bowl.
3- Beat butter, sugar, brown sugar and vanilla in a large bowl until creamy. Add eggs. Slowly add flour mixture. Stir in morsels.
4- Drop by well-rounded tablespoon onto ungreased baking sheet. Bake for 11 to 13 minutes or until cookies are puffed and centers are set. Cool on baking sheets for a few minutes and then transfer to wire rack to cool completely.

Chewy Gingersnaps

I've been baking up a storm recently. So now I'm going to get as many of the recipes posted as I can over the next few days. Some of them have photos and some don't. Mostly this is due to my camera's batteries running out, but also, I've come to accept that I am just not a very good food photographer. I may not be a very good photographer in general, but I'll leave that question for another day.

I'm not big on gingersnaps, though I love the smell. I was making holiday gift bags for my mom to give out with gift certificates to a coffeehouse and gingersnaps seemed both thematically and seasonally appropriate. Unfortunately my cookbooks and most of my recipes are in transit from my move, so I had to go out and find a new gingersnap recipe. This one is different from my regular one in that the cookies end up much bigger, flatter and chewier than my normal gingersnaps. I suppose these should really be called ginger-chews, but that just sounds gross. Overall, these are a nice alternative to the typical gingersnap.

Chewy Gingersnaps

2 cups sifted all-purpose flour
1 Tbsp. ground ginger
1 tsp. ground cloves
2 tsp. baking soda
1 tsp. ground cinnamon
1/2 tsp. salt
3/4 cup butter, softened
1 cup sugar
1 egg
1/4 cup dark molasses (come on, what's the point of mild molasses anyway?)
1/3 cup cinnamon sugar (you can use your favorite blend here... or eyeball it till it's the right color like I did)

1- Preheat oven to 350.
2- Sift together flour, ground ginger, ground cloves, baking soda, ground cinnamon and salt. Set aside.
3- Cream butter and sugar together. Beat in egg and molasses. Add 1/3 of flour mixture and stir until incorporated. Add remaining flour mixture and stir/mix until a soft dough forms (it will still be quite sticky).
4- Roll into 1" diameter balls and roll in cinnamon sugar (I used a cookie scoop to put the right amount of dough into the cinnamon sugar then once coated formed it into a ball. Less messy on your hands this way.).
5- Bake on ungreased cookie sheet until tops are rounded and slightly cracked, about 10 minutes. Let cool for a few minutes on the sheet then transfer to a wire rack to cool completely.

Thursday, April 16, 2009

Matzah Ball Soup

I'm behind in posting and have quite a backlog of recipes to add. I had hoped to put them in chronologically based on when I tried them out, but alas, that is not to be. There was a specific request for this recipe, so it comes first. And no, asking for the Cheesy Corn recipe will not hasten its appearance here. You know the rules.

Anyway, I made this soup for my Passover seder. I hadn't done my own matzah balls in a very long time or possibly ever. If I have, I think they were from a mix. Not that a mix is much of anything other than matzah meal. Regardless, I went all out on this one and did my own broth and matzah balls. It went over smashingly and I even made a second batch a few days later to use up leftover ingredients.

The glory of this recipe is that it can be tailored very easily to your specific tastes. Don't like celery but love carrots? Leave the celery out and add more carrots instead. Can't find a parsnip but have a turnip? Switch it out. Also, you can make this chicken broth and use it for all sorts of other soups or cook it down and use it as chicken stock.

Matzah Ball Soup

For the Chicken Broth:

Ingredients:

1 whole (3-4 pounds) fresh chicken
1 large parsnip quartered
2 leeks (white part only) cleaned thoroughly and quartered
1 small rutabaga quartered
3 ribs of celery with leaves halved
10 parsley stems
2 large carrots quartered
2 large onions quartered
8 peppercorns crushed
½ tsp dried thyme
Kosher or coarse salt
Salt and pepper to taste

1- Clean the chicken and discard giblets or other items in the cavity. Salt the entire chicken inside and out liberally with kosher or coarse salt. Let chicken stand for 35 minutes.
2- Wash salt from chicken and place in a large stockpot. Cover chicken with parsnip, leeks, rutabaga, celery, parsley, carrots, onions, peppercorns and thyme. Cover with 4 or 5 quarts of cold water. Bring to a boil over high heat, then immediately reduce the heat to simmer. Simmer for 1 ½ to 2 hours, occasionally skimming the foam from the top.
3- Remove the chicken to a large platter when it is still firm and not falling apart. Remove the meat from the chicken and save for other use or to put back in the soup later. Return the bones to the pot and simmer for one more hour.
4- Strain the soup into a large bowl and discard everything in the strainer. Refrigerate long enough to allow hardened fat to form on surface, then simply remove the fat setting it aside. Bring back up to heat with salt and pepper to taste.
5- For deeper flavor, you can repeat the process with another round of vegetables. If additional broth is needed, you may add more water and then the vegetables. Simmer for 2 hours or until the broth has the desired taste.

For the Matzah Balls:

Ingredients:

4 eggs
½ cup club soda
3 Tbsp vegetable oil or reserved chicken fat from broth
2 Tbsp finely chopped parsley
Salt
Freshly ground black pepper
1 cup matzah meal

1- Whisk the eggs until blended. Add the club soda, vegetable oil or fat, salt and pepper. Blend in the parsley and matzah meal. Cover and refrigerate this mixture for about 1 hour.
2- Bring about 5 quarts of water to boil. Rub vegetable oil on hands and form matzah balls with about 1 ½ to 2 tablespoons of mixture (makes about 12-15). Drop in boiling water and simmer covered about 35 to 45 minutes depending on desired consistency.
3- Serve in chicken broth. You can cook the matzah balls in the chicken broth for either the last 15 minutes of cooking or for an additional 15 minutes depending on the size of the matzah balls and preferred texture.

Saturday, February 28, 2009

Roasted Cauliflower and Tofu Curry

I've started to realize that there are a ton of recipes that I've tried that haven't made it in here yet. So I'm going to make a concerted effort over the next few weeks to get some of them posted. The best time to start is now.

I made this for Rachel at one point as a thank you for letting me use her car or driving me around or taking care of Gloucester... I dunno, something. Anyway, I can't eat it so I can't speak to the taste personally, but she indicated that it was good. It's also fairly decent for you, so that's an added bonus. It's also a good vegetarian dish. I served this up over brown rice, but you can used whatever kind you like or even some other grain.

Roasted Cauliflower and Tofu Curry

1 lb extra firm tofu, cut into 1-inch cubes
2 tsp olive oil
2 Tbsp curry powder (whatever kind you like will work but I used a madras variety)
1 tsp ground cumin
1 tsp ground ginger
1 tsp table salt
1 large onion, sliced into 1/4-inch half moons
1 medium head cauliflower, cut into 1 1/2-inch pieces (Don't use frozen. It'll end up too mushy.)

1- Preheat oven to 450 degrees. Gently press tofu between several layers of paper towels to remove excess water.
2- Heat a large nonstick skillet over medium-high heat. Add oil, spices and salt. Add onions and cook, stirring often, until onions are very wilted and browned (about 8 to 9 minutes or possibly longer depending on how precisely they are sliced).
3- Combine cauliflower and tofu in a large bowl. Pour onion mixture into bowl and coat with cooking spray; mix with a spoon to thoroughly coat. Spread mixture onto a baking sheet in an even layer.
4- Roast, stirring 3 times, until cauliflower and tofu are golden brown and smell very fragrant, about 25 to 35 minutes.

Sunday, July 27, 2008

Southwest Nacho Casserole

This was one of the Books & Snacks 2008 dishes. It makes a decent amount of food, so it would be good for a crowd.

Southwest Nacho Casserole

2 lbs lean ground beef (I did half beef, half turkey)
1 cup water
2 envelopes taco seasoning
1 can (4.5 oz) chopped green chilies
2 cans (16 oz each) refried beans
2 cups shredded Cheddar cheese (I used a four cheese blend)
1 cup chopped tomato
1/2 cup chopped green onions
1 can (2.5 oz) silced ripe olives, drained
1 bag gold tortilla chips (extra thick)
chopped cilantro if desired
sour cream if desired

1- Heat oven to 350 degrees. Spray 13x9 glass baking dish with cooking spray. Cook ground beef in a 12" nonstick skillet until thoroughly cooked. Drain and return to skillet.
2- Stir in water and taco seasoning into the skillet with the meat. Bring to a boil then cook for 2-4 minutes until thickened. Stir in chilies.
3- Spread refried beans into the bottom of the baking dish. Top with ground beef mixture. Cover tightly with foil.
4- Bake 30-40 minutes or until bubbly around the edges.
5- Remove from oven and uncover. Sprinkle with cheese, tomato, onion and olives. Arrange tortilla chips around the outside edges of baking dish. Return to oven and bake uncovered about 10 minutes or until cheese is melted. If desired, sprinkle with cilantro and top with sour cream. Serve with remaining tortilla chips for scooping.

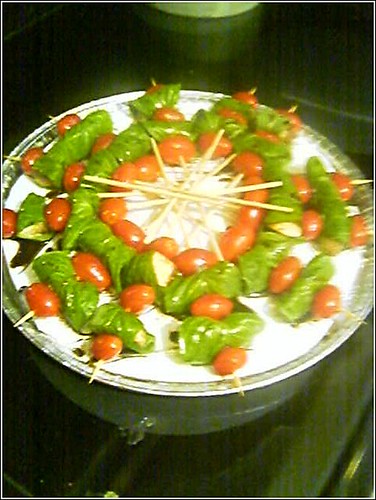
Mozzarella alla Caprese on a Stick


Sorry for the blurry image. The photo was taken back before I had a digital camera and only had the one on my phone. I made this for the first Family Dinner I went to back in Champaign when the theme was food on a stick. Since then, I've made it a number of other times and have they always get a great response. The fact that they're super easy makes them even better.

Mozzarella alla Caprese on a Stick

8 grape or cherry tomatoes
1 tablespoon virgin olive oil
4 (1/2 -ounce) balls fresh mozzarella (buffalo or regular)
4 large basil leaves
2 teaspoons balsamic vinegar (white or regular- using white limits discoloration, but I go with regular since it is what I already own)
Salt to taste
Fresh ground black pepper to taste

1- Make slits in each of the tomatoes (I usually do four around the sides from top to bottom). Marinate in the olive oil for 20 minutes.
2- Place the mozzarella balls in the balsamic vinegar and let set for 20 minutes. Remove the mozzarella and wrap in the basil leaves.
3- To assemble: Place one tomato on a 4-inch wood skewer, then the basil-wrapped mozzarella, then another tomato. Drizzle the remaining balsamic vinegar and olive oil over the entire kebab and season to taste with ground sea salt and cracked black pepper.

This makes four skewers. Recipe can be doubled, tripled, etc.

Wednesday, July 16, 2008

Maple-Glazed Walnuts

I've made these for Books & Snacks 2008. They have yet to be tried, but I've made similar ones in the past. That is somewhat reassuring to my nervous disposition.

Maple-Glazed Walnuts

1/4 cup light corn syrup
1 1/2 tsp maple flavor
2 Tbsp brown sugar
1/2 tsp salt
1/4 tsp hot pepper sauce
2 cups walnut halves and pieces

1- Heat oven to 325 degrees. Line a lipped cookie sheet with foil and spray foil with cooking spray.
2- In a medium bowl, combine all ingredients except walnuts and mix well. Add walnuts and toss to coat. Spread on the prepared cookie sheet, separating any large clumps.
3- Bake for 17 to 22 minutes, stirring every 5 minutes or until glaze thickens and adheres to nuts. Watch during the last 5 minutes to prevent burning.
4- Remove from oven and spread out nuts on waxed paper. Cool completely, then break apart.

Saturday, June 7, 2008

Prosciutto And Melon Skewers

Another food on a stick for Amy and Jim's shower. These look fancy, taste decadent and require no cooking. That makes them a win all around as far as I'm concerned. I do not have a melon baller (I know, I know), but I do have a small cookie scoop that worked just fine for the job. Because there are so few ingredients and no "seasonings," be sure that you go for good/high-quality items.

Prosciutto And Melon Skewers

12 thin slices of prosciutto
1 large ripe melon, such as cantaloupe
72 small mint leaves

1- Cut each slice of prosciutto in half lengthwise then fold in half lengthwise. Cut the melon in half, scoop out the seeds and peel away the skin. Cut the flesh into 72 equal pieces. If you are using a melon baller or cookie scoop, there is no need to remove the skin.
2- Thread a folded piece of prosciutto onto a skewer followed by a piece of melon and then a mint leaf. Fold the prosciutto around the melon piece and thread it onto the skewer a second time. Again follow with a piece of melon and a mint leaf. Do this one more time and then fold the end of the prosciutto over the top of the third melon/mint stack. When looking at the skewer, the prosciutto should be interwoven with three pieces of melon. Chill until required, but serve at room temperature.

Tabbouleh Party Pita Pockets

The ones without cheese were my vegan option for Jim and Amy's shower (in addition to the veggies and fruit of course). My version isn't exactly traditional tabbouleh as I didn't use bulgur, so I just called them Party Pita Pockets. They were still tasty or at least people told me they were.

Tabbouleh Party Pita Pockets

2/3 cup bulgur wheat (I actually used couscous as I had it on hand and needed to use it up.)
Juice of 1 large lemon
1 small garlic clove, chopped
2 Tbsp chopped fresh mint
2 Tbsp chopped fresh parsley
1/2 tsp ground cumin
2 tomatoes, peeled, seeded and diced (Yes, I used canned to make my life easier.)
4 scallions, minced
4 oz. feta cheese, crumbled
24 mini pitas (I got a package of whole wheat and one of white to further indicate the vegan vs. the not.)

1- Soak the bulgur wheat in a large bowl of cold water for 30 minutes; drain thoroughly (in my case, it was make the couscous and set aside).
2- Whisk together the lemon juice, garlic, mint, parsley and cumin in a small bowl. Stir into the bulgur wheat. Leave to marinate for at least 30 minutes and up to 8 hours.
3- Once marinated, add the tomatoes and scallions and mix well. If you intend to make the entire batch not vegan, you can also mix in the feta cheese at this point.
4- Lightly toast the mini pita breads and split each one across the top. Stuff with tabbouleh and serve. At this point, if you have not already mixed in the feta, you can sprinkle some of the crumbles on top of however many pitas you choose.

Sun-Dried Tomato And Olive Chicken Skewers

I made these for Jim and Amy's shower because everyone likes food on a stick.

Sun-Dried Tomato And Olive Chicken Skewers

7 oz. sun-dried tomatoes preserved in oil
1/2 cup pitted ripe olives
18 oz. boneless, skinless chicken breasts (I got the ones cut into tenders to save time.)
1 cup fresh white bread crumbs (I used seasoned packaged ones for simplicity's sake.)
2 Tbsp. chopped fresh parsley

1- Place the sun-dried tomatoes with the oil and the olives in a food processor and process into a rough puree. Season with salt and pepper to taste.
2- Cut the chicken into 48 1" cubes and place in a shallow non-metallic dish (or a large ziploc bag, which is what I used). Cover with tomato-olive mixture and marinate in the refrigerator for at least 30 minutes or up to 24 hours.
3- Preheat the oven to 400. Mix together the bread crumbs and parsley in a small bowl. Add salt and pepper to taste.
4- Thread 2 pieces of chicken onto each of 24 wooden skewers then sprinkle with the breadcrumb mixture (I lightly pressed each side of the skewered chicken into the breadcrumbs to minimize the mess.)
5- Arrange the chicken on a lightly oiled baking sheet and bake until the chicken is cooked through and tender (start checking it at about 10 minutes- you may want to turn the skewers over halfway through cooking to ensure a better crust on both sides.
6- Allow the chicken to rest before serving warm. These can also be served at room temperature.

Thursday, May 22, 2008

Broccoli And Cheddar Mini Quiche

Yes, my pretties, I know it's been a while since I've posted. It isn't because I haven't been cooking. Nor is it that I don't want to share the magic. I've just been swamped with other work and updating here has fallen by the wayside. But I'm hoping to remedy that with a flurry of posts over the next few days of tasty magical goodness I've been making since the last time I was around. Let's begin...

I've often made mini quiche over the years as finger food for various events. Usually I've done bacon, swiss, green onion and pimento or spinach, swiss and bacon. This time I needed a vegetarian option since I was making them for Jim and Amy's work-folk wedding shower, so I went with broccoli and cheddar. The nice thing about mini quiche is that once you have the basics down, you can change out the filling to suit your needs. Also, you can make these ahead of time and freeze them if need be.

Broccoli and Cheddar Mini Quiche

Pie crust for 2-crust pie (You can buy pre-packaged or make your own.)
1 cup cooked chopped broccoli (I got frozen florets to help speed things along since I was
making a ton of other food.)
1 cup shredded sharp Cheddar cheese
3 large eggs
1 tsp salt
1/8 tsp freshly ground black pepper
1 tsp Dijon mustard
1 cup heavy cream (You can also use half-and-half. I had heavy cream on hand so I went with it.)

1- Preheat oven to 400 degrees and grease and flour mini muffin tins.
2- Roll out pie crust to about 1/8" thickness (or if using pre-packaged, go with it as is when all unfolded). Cut out as many 2 1/2" rounds as you can from the dough. I have a scalloped edge cookie cutter that works perfectly and gives the edges a nicely finished look. Carefully fit each round into the muffin tin.
3- Sprinkle about 1/2 to 1 tsp of the chopped broccoli into each muffin cup and top with a small amount of shredded cheese.
4- Whisk together the eggs, salt, pepper, mustard and heavy cream. I do this in a liquid measuring cup with a spout to make the next step easier. Pour the mixture into each
muffin cup until just short of the top of the crust (about 3/4 full) and sprinkle each with a bit more broccoli.
5- Bake for 20-25 minutes or until set. When you go to remove these from the tins, use the edge of a knife to lift each mini quiche out as opposed to flipping the tin over.